Great Loop Planning Guide
Great Loop Trip Planning: How to Plan Locks, Bridges, Fuel and Daily Routes
Build a Great Loop route in FloatPlanWizard, review each leg, correct its drawn path and mileage, and turn the estimates into a realistic cruising day. Follow the current planning tools from saved waypoints through bridge and lock research, fuel checks and the Float Plan, then apply the workflow to a Chicago-to-Starved Rock corridor example.
Plan the Great Loop one realistic leg at a time
A Great Loop route gives the trip direction; a daily leg gives the crew a workable plan. Start with where you intend to leave, the water you expect to travel, and a stopping point you can reconsider. Distance, bridges, locks, fuel and daylight belong in the same decision.
You can open FPW's Trip Planner workspace to continue to the FPW Route Generator once your Getting Started checklist is complete. Build a route from saved waypoints, inspect the legs, correct the drawn path where needed, and review the resulting distance, timing and fuel estimates. The finished route then supports a Float Plan for the trip you actually intend to run.
The workflow: prepare the boat and waypoints; build the route; review each leg; adjust its geometry; check bridges, locks, time and fuel; choose a realistic daily endpoint; save the route; then review and share the Float Plan.
Treat the generated result as the start of captain review. FPW organizes your planning; the captain still validates the navigable path with current charts, Notices to Mariners, official navigation information and judgment.
Start with the boat FPW is actually planning for
In the dashboard, complete Getting Started before creating a route: save a vessel, a shore contact with name, phone and email, an operator, and at least two waypoints. Add passengers when others will be aboard. Use the Waypoints panel to save the start and intended destination, checking each name, latitude and longitude. Two waypoints provide the endpoints of one leg; a return journey needs its own leg.
Know the boat's air draft in its intended configuration, draft under the expected load, usable fuel, normal cruise performance and the crew's realistic travel-day limit. Air draft and draft are checks you make against route constraints; the Route Generator does not certify bridge clearance or water depth.
Select the correct Vessel in the Route Generator, then review its planning inputs. Do not accept a speed or burn figure just because a field is populated.
- Most Efficient Speed (kn) and GPH @ Efficient describe the cruising combination you expect to use.
- Max Speed (kn) and GPH @ max speed support the faster-speed and relaxed-pace estimates. Review the displayed Adjusted Speed after choosing Pace.
- Idle Burn (GPH) and Idle Hours (total) let you enter an explicit allowance for time with the engine idling.
- Weather Factor (%) is a planning allowance. It is not confirmation of the conditions you will encounter.
- Reserve Method and Underway Hrs / Day set fuel-reserve assumptions and the timeline's daily planning budget.
Use usable fuel rather than nominal tank size when checking range in the Boat Fuel Calculator. Measure and confirm your own boat's limits instead of adopting another captain's figures.
Generate your starting Great Loop route
The current member workflow is My Routes & Waypoint Builder. You select saved waypoints to define the route; this screen does not offer an automatic Great Loop itinerary or a visible route-template picker.
- On the dashboard, choose + Create Route. Enter a descriptive Route Name. The guided tour can help identify the controls.
- In Create Route, enter the route name and choose Create. This creates the My Route you will build; it does not send a Float Plan.
- Choose your departure waypoint under Route Start Waypoint, then choose Set Start.
- Under Add Leg by Waypoint, select the next intended waypoint and choose Add Leg. Repeat for additional legs. The next destination extends the sequence from the previous endpoint.
- Choose Load to populate Route Summary and Legs and the Cruise Timeline. Confirm the vessel, speed, fuel and daily-hours inputs.
- Review and adjust the result before using Save Route. Saving a route and sending a Float Plan are separate actions.
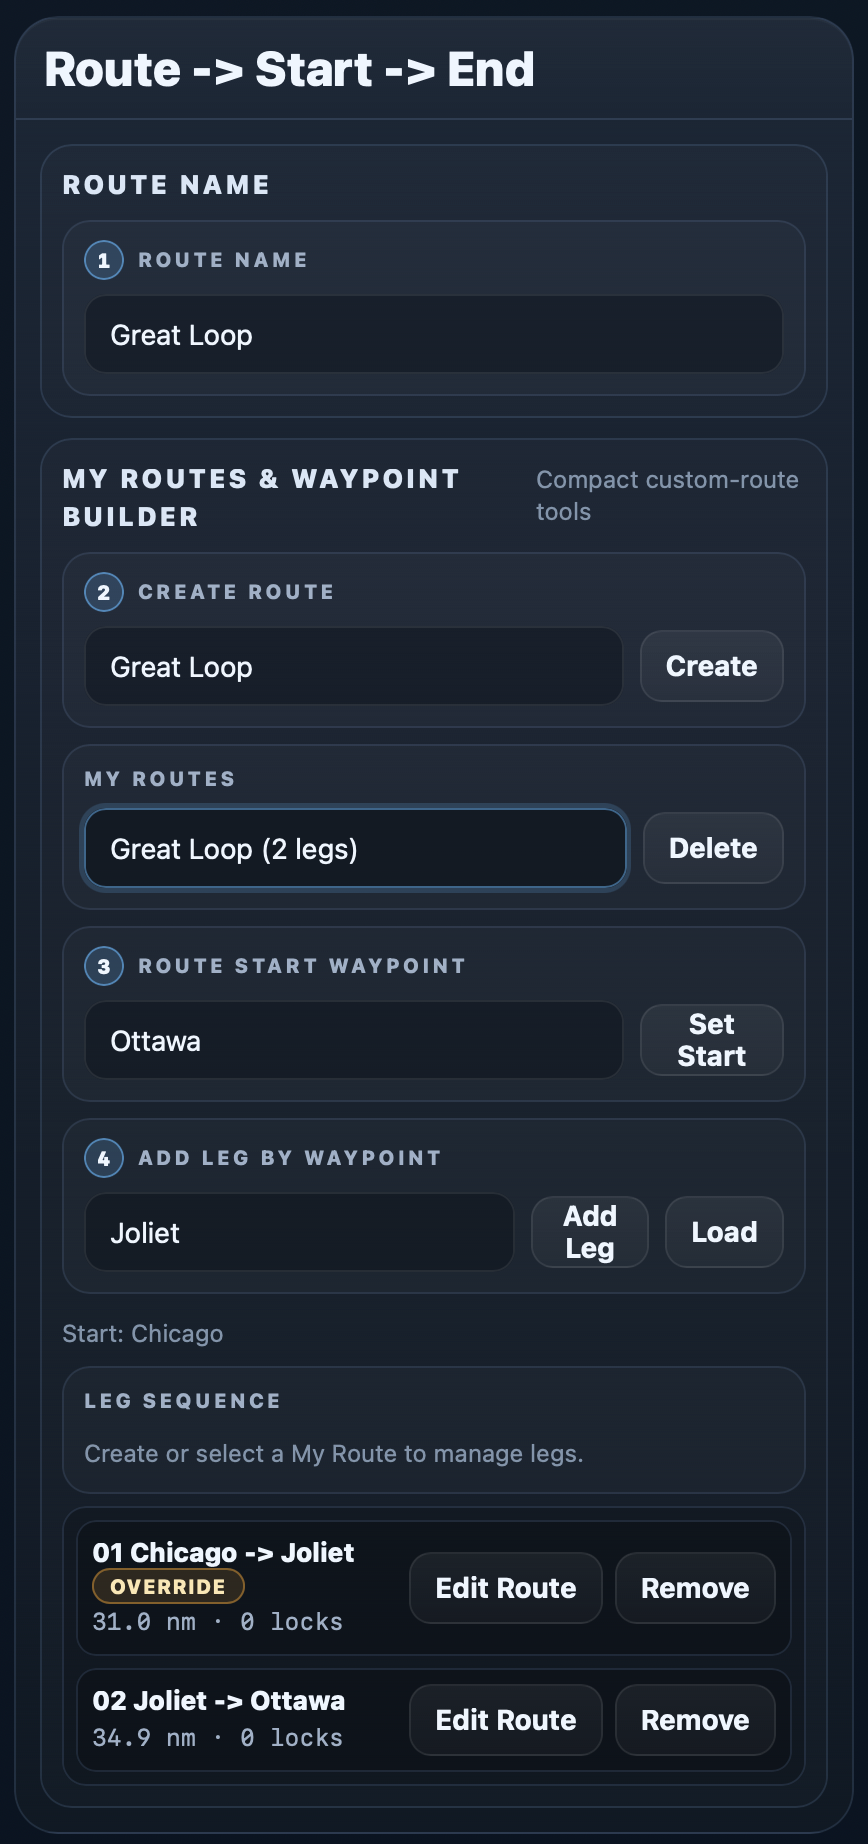
A waypoint leg may begin with a straight-line distance and no saved navigable geometry. A line between two coordinates does not establish a usable channel. Use the leg review and geometry steps below before treating that distance as a cruising estimate.
Review the route one leg at a time
Under Cruise Timeline, review each leg's start and destination, Locks count, effective NM and Edit Route control. The summary above provides Total Distance, Total Travel Hours, Estimated Fuel and Adjusted Speed. These are estimates based on the route and inputs currently loaded.
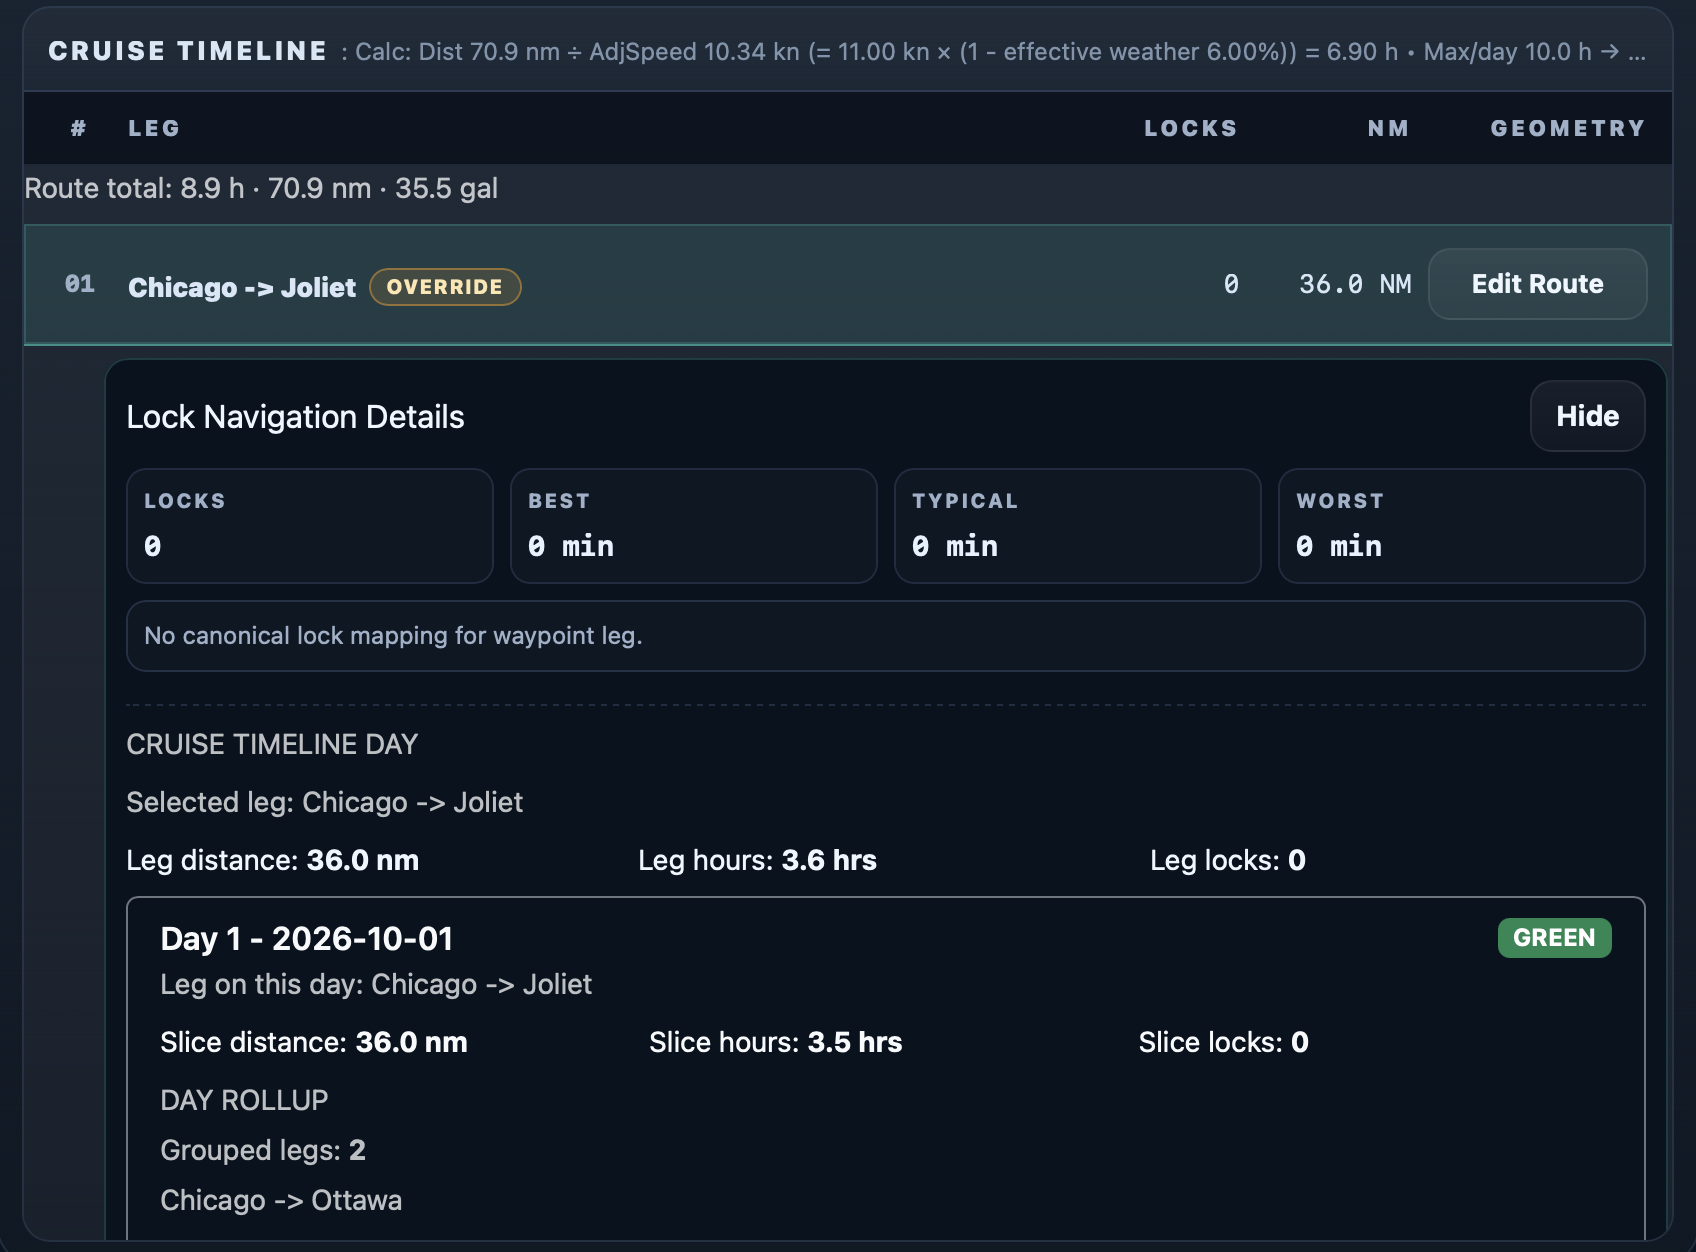
- Does the path follow the waterway and approach you intend to use? Check more than the endpoint names.
- Does the leg's distance reflect that path, including approaches and deliberate detours?
- Which bridges and locks actually lie on this leg? A zero lock count on a waypoint-only leg does not establish that no locks are present.
- At the selected pace, does the running time leave room for waiting, maneuvering, conditions and a suitable stopping point?
The timeline can allocate a long leg across planning days. A day boundary is a time-budget result; it is not a verified marina, anchorage or safe place to stop. Review the complete leg and the practical stopping options yourself.
Generated mileage is a starting point — correct the path when necessary
FPW's current mileage override is a geometry edit. There is no numeric “actual mileage” box in this workflow. You draw or edit the expected path and FPW calculates Computed NM from that line. This is planned distance, not a measurement of a voyage already traveled.
Use this when a direct line misses the navigable channel, an approach is longer than the initial estimate, or your intended path changes because of a constraint. The line must reflect a path you have independently checked; adding points to a map does not validate safe passage.
- Choose Edit Route beside the leg in Cruise Timeline or in the My Route's Leg Sequence. The Leg Geometry panel opens.
- Check the leg title, its source and Computed NM. If there is no saved geometry, the panel says to draw a polyline.
- Use the map's Draw a polyline control to trace the expected path. Click successive points and finish the line. For an existing drawn line, use Edit layers and finish that map edit. Check the start, end and intermediate points.
- Review the recalculated Computed NM, then choose Save Overrides. Finishing the map drawing alone is not the same as saving the override.
- Close the map panel and inspect the leg's updated NM and Override indication. Choose Load for the selected My Route to review its current total, timeline and fuel estimate again before saving the route.
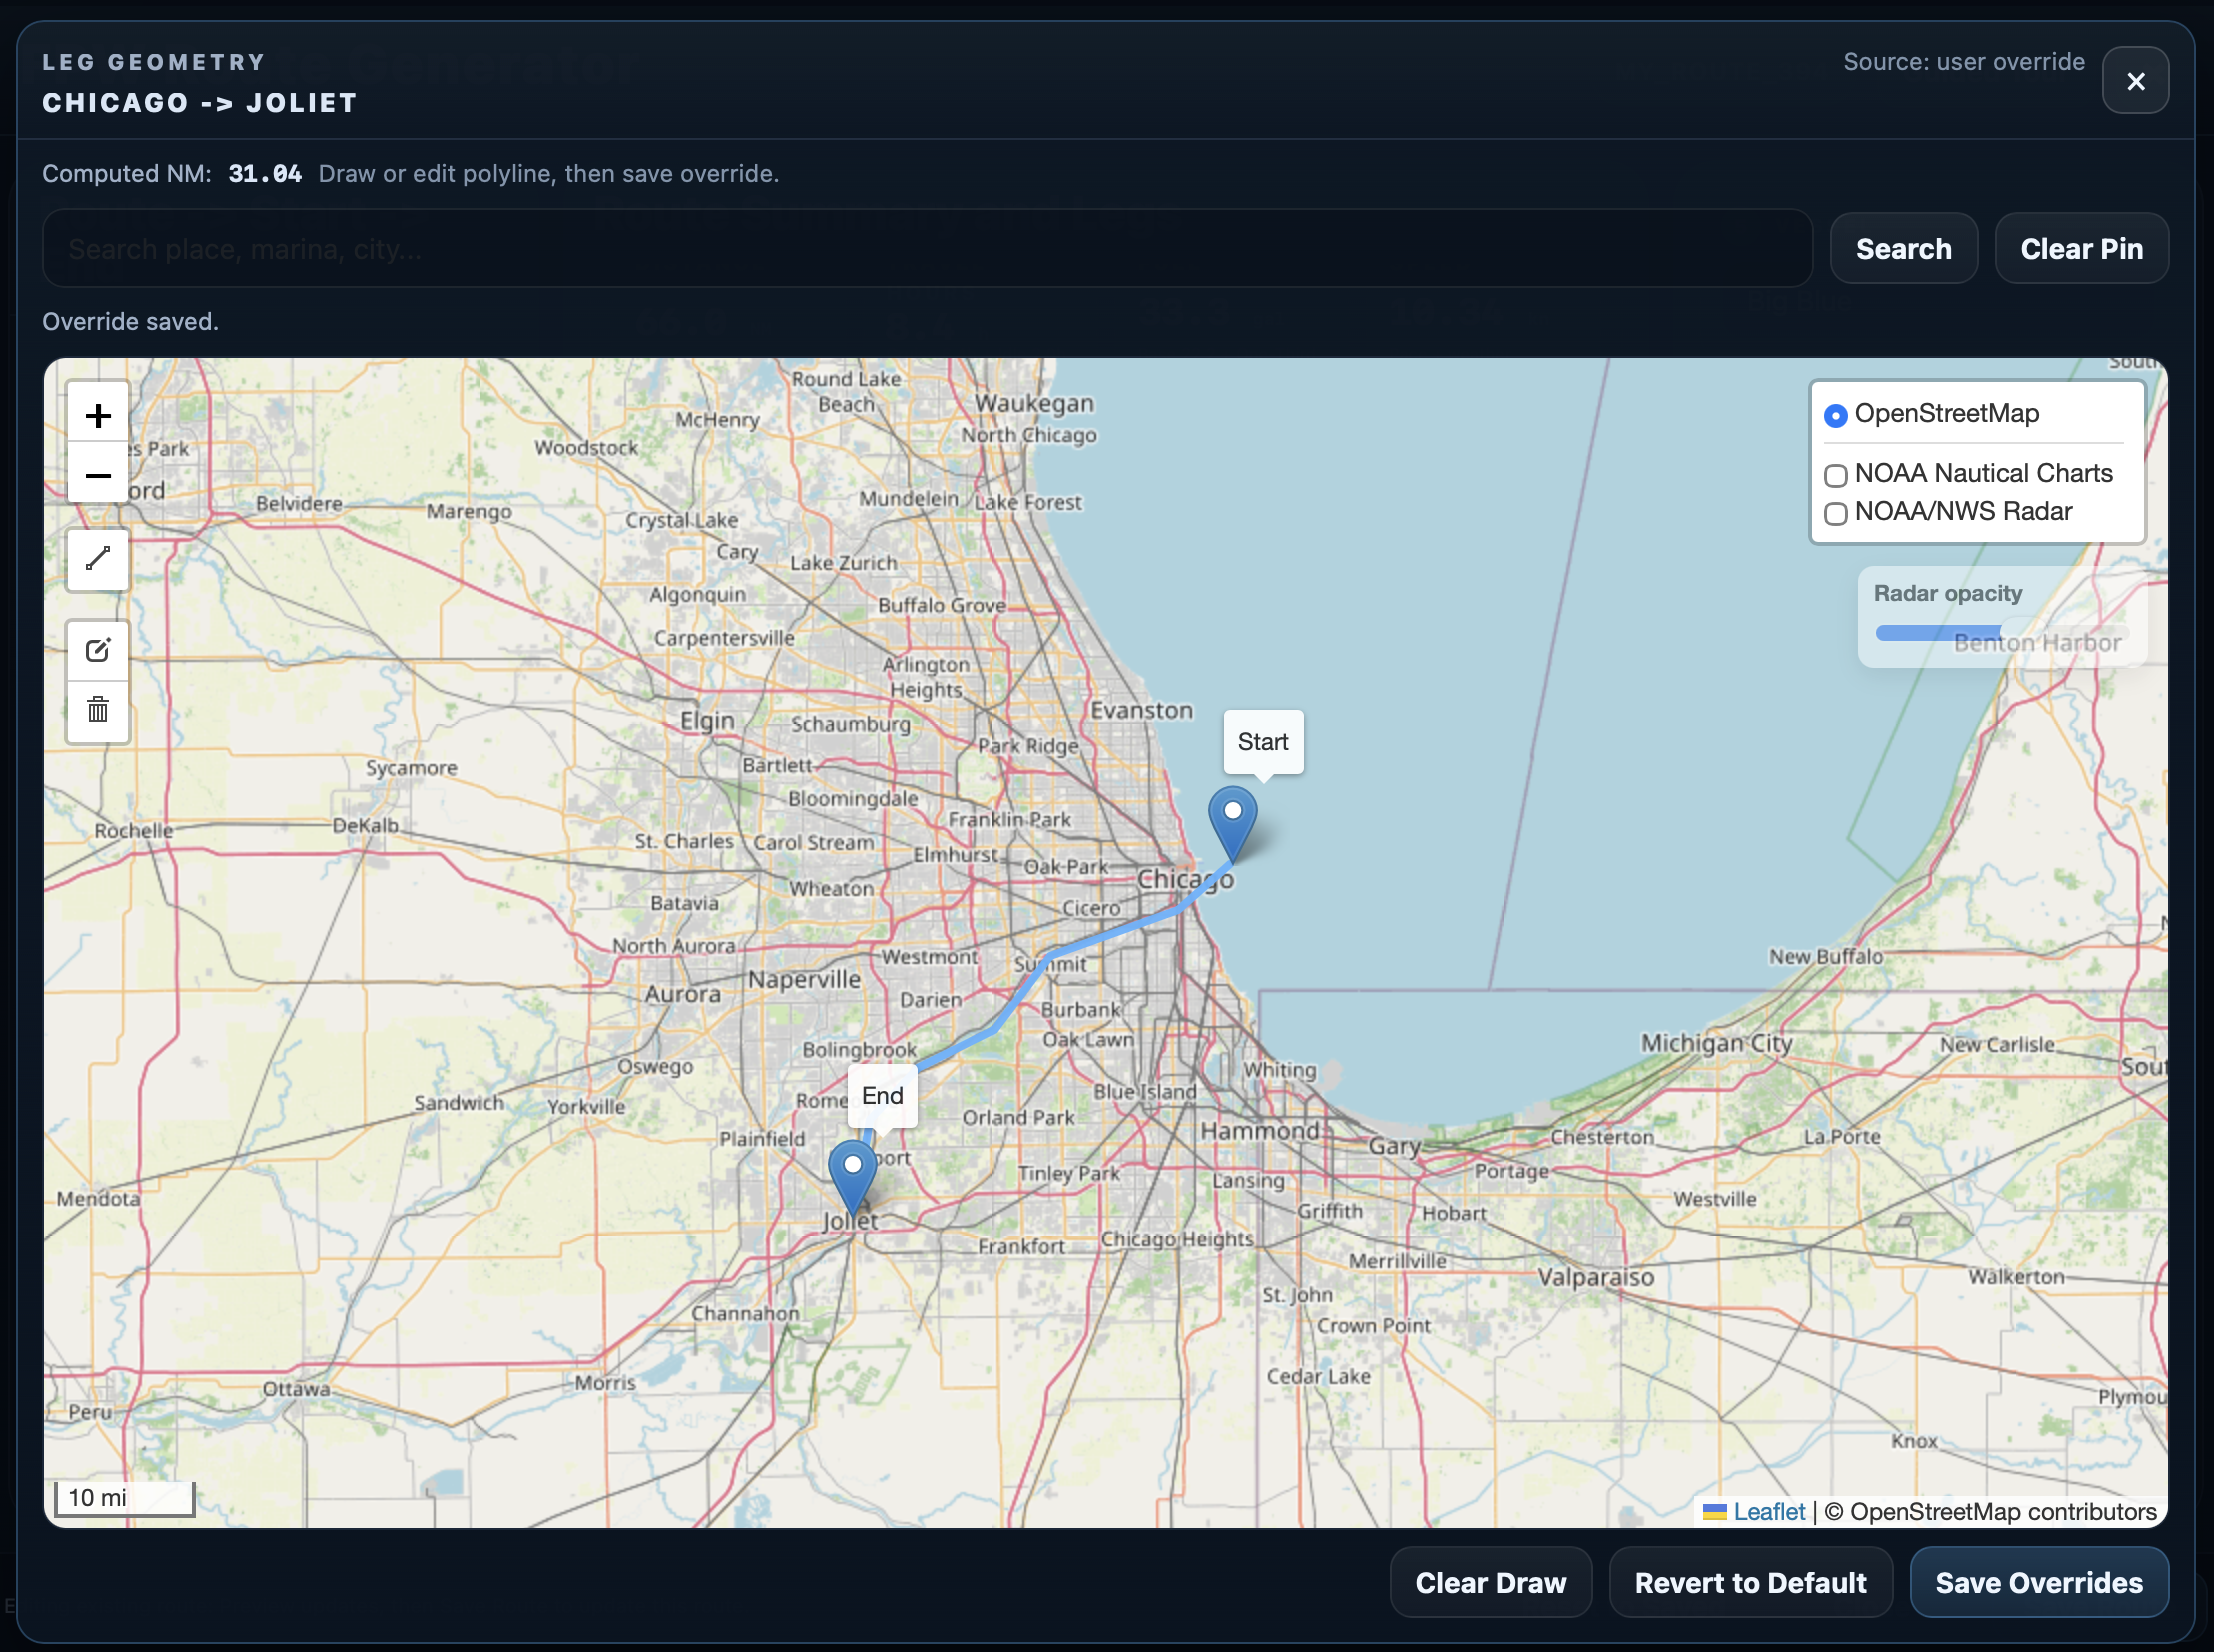
What is saved: FPW stores the drawn geometry and its calculated mileage as your override. The My Route's base distance remains separate. The visible leg shows the effective distance; it does not display the original and overridden mileages side by side. Note the original value before editing if you want to compare them.
What changes: the effective leg distance and route total change. When the route is reloaded or its estimates are rebuilt, the adjusted distance feeds the timing and Route Generator fuel calculations. A longer expected path can therefore change the planning hours, fuel requirement and daily allocation.
What to check separately: an existing generated route's geometry save can update NM before its previous timeline and fuel display refresh. Save the edited route and review the refreshed estimates; do not rely on an unchanged time or fuel card immediately after a map save. This does not automatically revise an already-created Float Plan's return time or the separate public Fuel Calculator.
Change or remove an override: reopen Edit Route, revise the line and save again. Revert to Default removes the applicable saved override and reloads the available default; verify the resulting NM. Clear Draw clears the working drawing; saving that cleared state also removes the override. Do not treat Clear Draw as a private sketch reset once you save it. On a previously generated route, the default can be its saved base distance, so check the result rather than assuming it restores an earlier estimate. Revert to Default on an existing generated route also clears any saved segment-wide override, which can affect other routes using that saved segment geometry.
Adjust the route when reality requires it
Decide whether you are changing the path between the same endpoints or the endpoints of the day's route. A geometry override addresses the first. It does not change the leg's destination, reorder the route or discover the bridges and locks crossed by the new line.
For a different endpoint, save the needed waypoint on the dashboard and return to My Routes & Waypoint Builder. Add Leg extends the current route. To replace the final destination, use Remove on the final leg, select the new destination, then choose Add Leg. Removing an intermediate leg reconnects the following leg and clears that following leg's saved geometry override. Review its new endpoints and redraw the path where needed. Check every adjacent start and destination before choosing Load.
This is useful when a bridge constraint changes an approach, a lock transit makes the day too long, weather suggests a shorter run, or fuel margin calls for a different stopping decision. Change the proposed route to match the plan you can defend, then check distance, references, time and fuel again.
Reuse deliberately: select a saved My Route to load it again. Geometry overrides are saved with their route context; do not assume one edit updates every other route using similar waters. After changing the leg sequence or regenerating a saved route, reopen each edited leg and verify that its geometry and mileage still belong to the correct endpoints. Reset is not a general undo of changes already saved.
Plan these changes before departure. An active trip has additional controls and restrictions; this tutorial does not promise that rebuilding an active route will safely replace its live itinerary.
Connect Great Loop bridge research to the route you drew
- Start with the proposed route and open the Great Loop Bridges references. Identify the entries relevant to the waterways and approach you intend to use.
- Compare your boat's air draft with the applicable information. Distinguish fixed structures from opening bridges and closed clearance from open clearance. Confirm current conditions and operating information before depending on passage.
- If the approach changes, decide whether to edit a leg's geometry or rebuild the waypoint sequence. A drawn override does not perform an automatic clearance check.
- Load the changed route and review mileage, timing and fuel again. An approach change can affect more than the bridge crossing itself.
For the Chicago-area example, use the Illinois / Chicago bridge references and the Chicago River approach reference. The latter provides context for evaluating downtown Chicago and Cal-Sag alternatives. Use it to organize the comparison; it does not select a suitable approach for your vessel.
Running time is only part of a lock day
A realistic day may include underway time, lock approach and maneuvering, waiting, lock passage, bridge timing, fuel or rest stops, and weather margin. Distance divided by speed covers only part of that day.
Open the Great Loop Locks library while reviewing the leg. Identify the facilities relevant to the selected path and use their individual pages as planning references. Confirm actual access and operating information separately; stored reference information is not a live queue or operating notice.
Where a route leg has mapped lock information, its expanded Lock Navigation Details can show Best, Typical and Worst waiting estimates and notes. These are stored planning assumptions, not live waiting times. Waypoint-only legs may have no canonical lock mapping; absence of details does not mean there is no lock to research.
For the My Route workflow taught here, do not assume lock delays are automatically added to the timeline. A lock count or details panel is not proof that waiting and lock passage have been included. There is no per-lock delay entry in this screen.
Estimate extra time separately from running time. For expected engine-idling time, enter an allowance in Idle Hours (total) and confirm Idle Burn (GPH). That affects the summary hours and idle-fuel estimate; it does not automatically move the timeline's daily boundaries. Keep non-idling waits, bridge timing, shore stops and additional margin in your own schedule as well. Count each allowance once.
Use the corrected mileage to check fuel
- Finish reviewing the path and reload the route. Read the effective leg NM and Total Distance. If you are checking one cruising day, use the distance you actually intend to cover that day rather than the entire multi-day route.
- Open the Boat Fuel Calculator and manually enter that value in Total Distance (NM). Route Generator distances do not automatically transfer to this public calculator.
- Enter your Most Efficient Speed (kn), GPH @ Efficient, Max Speed (kn) and applicable Fuel Burn @ Max (GPH). Choose Pace and review the Weather Factor (%) assumption.
- Enter expected Idle Hours and Idle Burn (GPH) where appropriate. Use Usable Fuel Capacity and select your Reserve Method; do not substitute nominal tank size for fuel you can actually use.
- Review estimated fuel and range against usable fuel and the reserve you intend to preserve. Confirm practical refueling arrangements separately. If margin is uncomfortable, shorten or revise the leg and repeat the calculation.
The Route Generator also provides its own fuel estimate using the loaded route and its inputs. The public calculator is a separate manual check, not a synchronized view of that route. Match distance, pace, burn, weather and idle assumptions deliberately, and update both tools after a material change.
Neither result guarantees consumption or fuel availability. A comfortable estimate is useful only if the chosen path, boat performance and allowances are realistic.
Turn generated mileage into a realistic day's schedule
Distance alone is not the schedule. FPW uses effective leg mileage, the selected pace and speed inputs, and weather adjustments to estimate running time. The timeline uses the daily-hours budget to group travel into planning days. It does not establish a guaranteed arrival clock time or confirm an overnight stop.
- Finalize the leg geometry and choose Load to review the current NM. Verify the displayed distance after every material route change.
- Confirm the selected Vessel, speed inputs and Pace. Review Adjusted Speed and Total Travel Hours. The weather allowance can affect modeled speed; it does not replace checking the forecast.
- Set Underway Hrs / Day to a realistic travel budget. Review the resulting allocation, particularly any leg split across planning days.
- Add your researched lock and bridge allowances, fuel/rest stops and margin to the day's running estimate. Treat Idle Hours as a summary allowance, not an automatic appointment scheduler.
- Compare the realistic total with your departure window, daylight and intended arrival. If the day is too ambitious, change the waypoint endpoint or shorten the planned run and load it again.
- When preparing the Float Plan, review its departure and Return Date & Time in the selected timezone. Set a realistic return value; an earlier geometry or idle-time edit is not confirmation that the Float Plan's time has changed.
The generated estimate helps compare choices. Your captain-adjusted schedule adds the constraints that the model does not know. Keep those assumptions available when you review the route and explain the plan to your shore contact.
Choose the daily stopping point after reviewing the estimates
Use the combined distance, running time, delays and fuel requirement to decide where the day should end. A timeline split is not a recommendation to stop at that exact point. Check whether a marina, anchorage, mooring or other stopping area is suitable, accessible and available for your boat.
Save an appropriate waypoint for the endpoint you have researched and use it when building the day's route. If the current leg goes farther than the day can support, revise the waypoint sequence and review the changed geometry and NM. FPW does not confirm marina availability or make stopping arrangements for you.
Identify an earlier suitable option before departure. When a meaningful delay changes remaining time, daylight or fuel margin, reconsider the endpoint while alternatives remain available. Communicate material route or timing changes to your shore contact.
Worked example: Building a Chicago-area Loop leg in FPW
Use Chicago toward the Starved Rock corridor to practice the workflow. This is a planning/reference example, not a guaranteed lock sequence or prescribed itinerary. It does not assume the corridor is one day's run. Choose the actual start, approach and daily endpoint for your boat and conditions. The practice screenshots above illustrate the controls only; they do not depict this corridor.
- Build the starting route. Save the waypoints for the departure and intended endpoint you are evaluating. Choose + Create Route, name the My Route, choose Set Start, add the next waypoint with Add Leg, and choose Load. Do not assume the initial line follows the waterway.
- Review Chicago bridge constraints. Use the Illinois / Chicago references to compare the selected approach with your boat's air draft. Determine which path needs further checking before accepting the route.
- Review potentially relevant lock references. The Chicago / Illinois Waterway references help organize that research. The following list is unordered and does not establish a travel sequence:
- Brandon Road Lock
- Dresden Island Lock
- Lockport Lock
- Marseilles Lock
- Starved Rock Lock
- Thomas J. O'Brien Lock
- Inspect every leg's mileage. Compare its endpoints and effective NM with the navigable path you intend to run. Review the approach, not just the corridor's place names.
- Correct the expected path where needed. Choose Edit Route, draw or edit the reviewed geometry, inspect Computed NM and choose Save Overrides. This replaces the distance used for that leg with the distance calculated from your saved line; it is not a numeric mileage-entry field.
- Reevaluate running time. Load the My Route again. Confirm speed, pace, daily hours and the refreshed estimate. Do not carry forward the first distance or timing figure after changing the path.
- Account for locks and other delay. Use the selected lock references and current operating information to build your own allowance. The custom My Route timeline does not automatically include those lock delays. Enter expected idle time for the fuel/summary calculation and review the full schedule separately.
- Check fuel. Enter the corrected daily distance manually in the Boat Fuel Calculator. Apply the boat's realistic performance, idle allowance and reserve. Revise the leg if the margin is inadequate.
- Decide where the day should end. Evaluate a suitable endpoint against realistic time, fuel and daylight. If necessary, revise the waypoint sequence and repeat the review before saving the route and preparing the Float Plan.
The goal is to turn the initial route into the route you actually intend to run. A useful result is a reviewed plan with room to adapt, not a promised arrival at Starved Rock.
Turn the finished route into the trip you'll actually run
After reviewing the route and choosing Save Route, return to the dashboard's Routes list. The Activate Route action prepares a draft Float Plan and opens its editor. Despite that action's name, this step alone does not send the plan or start monitoring. An existing draft can be reopened with Complete Float Plan.
Work through the Float Plan editor: confirm the vessel and operator, passengers where applicable, route details, departure, return date/time and timezone. Review the itinerary instead of assuming that every earlier planning change has already updated the draft. Select the intended shore contact and check the final review.
Save Float Plan saves the draft without sending. The review screen presents separate send choices: Basic Save & Send emails a PDF copy to one selected contact and leaves the plan as a draft; Premium Save & Send uses the operational sharing path when the account qualifies. Follow the explanation shown for the action you choose rather than treating these choices as equivalent.
Arrange a shore contact who agrees to receive and understand the trip details. Share the reviewed plan before departure, confirm expectations for check-ins and changes, and review how a Float Plan helps your shore contact. Saving or generating a route alone does not notify anyone.
For a later voyage, start from the saved route and review the new trip's details and schedule. Do not reuse an old shared plan as evidence that someone has received the current plan.
Before accepting tomorrow's Great Loop leg
Review the tools and decisions together before departure:
- Boat air draft, draft, loading and usable fuel reviewed
- Saved waypoints checked; intended route built and loaded in FPW
- Every leg's endpoints, navigable path and generated NM reviewed
- Geometry overrides saved where needed; resulting leg and route NM checked
- Bridge constraints and relevant lock references reviewed for the selected path
- Vessel, speed inputs and Pace confirmed
- Fresh timing estimate and Underway Hrs / Day reviewed
- Lock/bridge waits, idle time, stops and margin considered without double-counting
- Corrected daily NM entered manually in the Fuel Calculator
- Fuel requirement checked and intended reserve preserved
- Daily endpoint and earlier alternative researched for suitability and availability
- Weather and current operating information checked
- Changed routes reloaded; edited legs and totals checked again
- Float Plan itinerary, departure, return time and timezone reviewed
- Shore contact identified; final Float Plan ready to share before departure
Turn your Great Loop research into an actual trip plan
Bring your boat's limits, reviewed route, corrected geometry, realistic timing and fuel check into one planning workflow. Then review the Float Plan for the voyage you actually intend to run.
Plan your next boating trip for free
Bring your boat, route and daily timing together in a trip plan you can review and share before departure.
Need to check your range first? Use the Boat Fuel Calculator.